Set up a GCP VM build infrastructure
Currently, this feature is behind the Feature Flag CI_VM_INFRASTRUCTURE. Contact Harness Support to enable the feature.
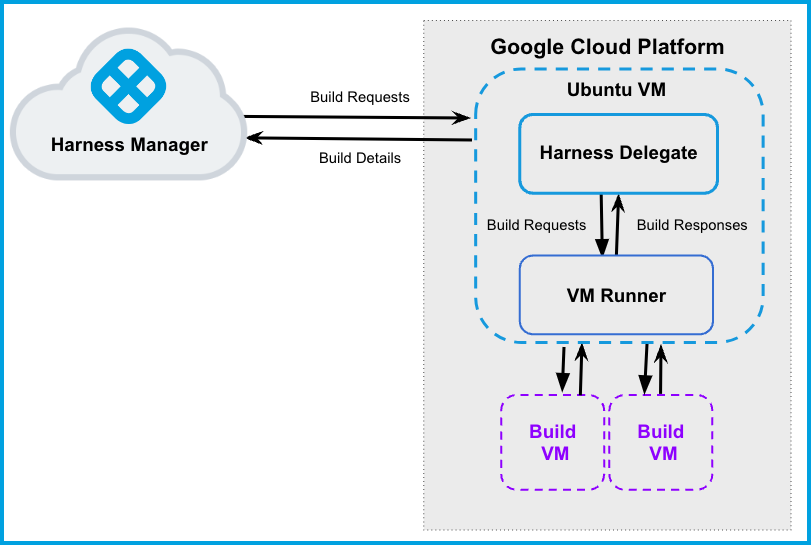
This topic describes how to set up a CI build infrastructure in Google Cloud Platform (GCP). To do this, you will create an Ubuntu VM and then install a Harness Delegate and Drone VM Runner on it. The runner creates VMs dynamically in response to CI build requests.
This is one of several CI build infrastructure options. For example, you can also set up a Kubernetes cluster build infrastructure.
The following diagram illustrates a CI build farm. The Harness Delegate communicates directly with your Harness instance. The VM Runner maintains a pool of VMs for running builds. When the delegate receives a build request, it forwards the request to the runner, which runs the build on an available VM.
Prepare the Google Cloud VM
These are the requirements to configure the Google Cloud VM. This is the primary VM where you will host your Harness Delegate and runner.
Log into the Google Cloud Console and launch a VM to host your Harness Delegate and runner.
- Select a machine type with 4 vCPU and 16 GB memory or more. Harness recommends an Ubuntu 20.04 LTS machine image, such as Focal or Jammy.
- To find images to use on Google Compute Engine, run
gcloud compute images list. Valid image references follow the format ofprojects/PROJECT/global/images/IMAGE. For example:projects/docs-test/global/images/ubuntu-pro-1804-bionic-v20220131.
Configure the VM to allow ingress on ports 22 and 9079.
SSH into the VM, if you haven't done so already.
Run
gcloud auth application-default loginto create anapplication_default_credentials.jsonfile at/home/$(whoami)/.config/gcloud.
Configure the Drone pool on the Google Cloud VM
The pool.yml file defines the VM spec and pool size for the VM instances used to run the pipeline. A pool is a group of instantiated VMs that are immediately available to run CI pipelines. You can configure multiple pools in pool.yml, such as a Windows VM pool and a Linux VM pool.
Create a
/runnerfolder on your Google Cloud VM andcdinto it:mkdir /runner
cd /runnerCopy your
application_default_credentials.jsonfile into the/runnerfolder. You created this file when you prepared the Google Cloud VM.In the
/runnerfolder, create apool.ymlfile.Modify
pool.ymlas described in the following example and the Pool settings reference.
Example pool.yml
version: "1"
instances:
  - name: ubuntu-gcp
    default: true
    type: google
    pool: 1
    limit: 1
    platform:
      os: linux
      arch: amd64
    spec:
      account:
        project_id: ci-play ## Your Google project ID.
        json_path: /path/to/key.json ## Path to the application_default_credentials.json file.
      image: projects/ubuntu-os-pro-cloud/global/images/ubuntu-pro-1804-bionic-v20220510
      machine_type: e2-small
      zone: ## To minimize latency between delegate and build VMs, specify the same zone where your delegate VM is running.
        - us-central1-a
        - us-central1-b
        - us-central1-c
      disk:
        size: 100
        type: "pd-balanced"
Pool settings reference
You can configure the following settings in your pool.yml file. You can also learn more in the Drone documentation for the Pool File and Google drivers.
| Setting | Type | Example | Description |
|---|---|---|---|
name | String | name: windows_pool | Unique identifier of the pool. You will need to specify this pool name in Harness when you set up the CI stage build infrastructure. |
pool | Integer | pool: 1 | Warm pool size number. Denotes the number of VMs in ready state to be used by the runner. |
limit | Integer | limit: 3 | Maximum number of VMs the runner can create at any time. pool indicates the number of warm VMs, and the runner can create more VMs on demand up to the limit.For example, assume pool: 3 and limit: 10. If the runner gets a request for 5 VMs, it immediately provisions the 3 warm VMs (from pool) and provisions 2 more, which are not warm and take time to initialize. |
platform | Key-value pairs, strings | platform: os: linux arch: amd64 | Specify VM platform operating system (os) and architecture (arch). variant is optional. |
spec | Key-value pairs, various | Go to Example pool.yml. | Configure settings for the build VMs.
|
Start the runner
SSH into your Google Cloud VM and run the following command to start the runner:
docker run -v /runner:/runner -p 3000:3000 drone/drone-runner-aws:latest delegate --pool /runner/pool.yml
This command mounts the volume to the Docker container providing access to pool.yml and JSON credentials to authenticate with GCP. It also exposes port 3000 and passes arguments to the container.
You might need to modify the command to use sudo and specify the runner directory path, for example:
sudo docker run -v ./runner:/runner -p 3000:3000 drone/drone-runner-aws:latest delegate --pool /runner/pool.yml
When a build starts, the delegate receives a request for VMs on which to run the build. The delegate forwards the request to the runner, which then allocates VMs from the warm pool (specified by pool in pool.yml) and, if necessary, spins up additional VMs (up to the limit specified in pool.yml).
The runner includes lite engine, and the lite engine process triggers VM startup through a cloud init script. This script downloads and installs Scoop package manager, Git, the Drone plugin, and lite engine on the build VMs. The plugin and lite engine are downloaded from GitHub releases. Scoop is downloaded from get.scoop.sh.
Firewall restrictions can prevent the script from downloading these dependencies. Make sure your images don't have firewall or anti-malware restrictions that are interfering with downloading the dependencies.
Install the delegate
Install a Harness Docker Delegate on your Google Cloud VM.
In Harness, go to Account Settings, select Account Resources, and then select Delegates.
You can also create delegates at the project scope. To do this, go to your Harness CI project, select Project Setup, and then select Delegates.
Select New Delegate or Install Delegate.
Select Docker.
Enter a Delegate Name.
Copy the delegate install command and paste it in a text editor.
To the first line, add
--network host, and, if required,sudo. For example:sudo docker run --cpus=1 --memory=2g --network hostSSH into your Google Cloud VM and run the delegate install command.
The delegate install command uses the default authentication token for your Harness account. If you want to use a different token, you can create a token and then specify it in the delegate install command:
- In Harness, go to Account Settings, then Account Resources, and then select Delegates.
- Select Tokens in the header, and then select New Token.
- Enter a token name and select Apply to generate a token.
- Copy the token and paste it in the value for
DELEGATE_TOKEN.
For more information about delegates and delegate installation, go to Delegate installation overview.
Verify connectivity
Verify that the delegate and runner containers are running correctly. You might need to wait a few minutes for both processes to start. You can run the following commands to check the process status:
$ docker ps
$ docker logs DELEGATE_CONTAINER_ID
$ docker logs RUNNER_CONTAINER_ID
In the Harness UI, verify that the delegate appears in the delegates list. It might take two or three minutes for the Delegates list to update. Make sure the Connectivity Status is Connected. If the Connectivity Status is Not Connected, make sure the Docker host can connect to
https://app.harness.io.
The delegate and runner are now installed, registered, and connected.
Specify build infrastructure
Configure your pipeline's Build (CI) stage to use your GCP VMs as build infrastructure.
- Visual
- YAML
- In Harness, go to the CI pipeline that you want to use the GCP VM build infrastructure.
- Select the Build stage, and then select the Infrastructure tab.
- Select VMs.
- Enter the Pool Name from your pool.yml.
- Save the pipeline.

    - stage:
        name: build
        identifier: build
        description: ""
        type: CI
        spec:
          cloneCodebase: true
          infrastructure:
            type: VM
            spec:
              type: Pool
              spec:
                poolName: POOL_NAME_FROM_POOL_YML
                os: Linux
          execution:
            steps:
            ...